Showing posts with label Ed. Show all posts

Wednesday, October 22, 2008

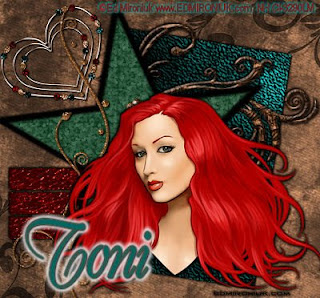
Hair of Fire


I used PSP 9 to create this tutorial.

CILM Tou #32

Plugins needed:

Alien Skin 5 Impact - Gradient Glow

Scrapkit Villa Tuscan is by Toni and is a PTU Kit. It can be found here

The tube is by Ed Mironiuk and can be purchased at CILM

Supplies:

Tube of choice

Villa Tuscana Scrap Kit

Ali's Template NO 68

Font is FrancineHMK

To get Started:

Open the template and you will see all the layers, they are all named. I deleted the layer with the info on it.

Add a layer and move it to the bottom of the layers. Choose a paper you like from your kit and flood flll this layer.

Now choose the Back Shape layer. Close the other layers so you can see this one better. (click on the eyes in your layer palette to do this) Using the magic wand click on the shape, then go to your kit and pick another paper from it. Flood fill the shape. Selections none.

Unhide the Side Rectangle layer and hide the Back Shape Layer. Do as you did with the previous layer, but this time when you are clicking on the bars, hold down the shift key to capture them all. Once they are flood filled, Selections none.

Okay Hide that layer and unhide the Inside Star layer. Click on the Star as before but this time fill it with a pattern you have in your collection that matches the ones you've already used, or use a solid color. I used YWN-bgrd-069.

Now Drop Shadow on all the layers. 2/ -2 100 5 You will need to go back to them individually to do this. You can unhide them all as you do it.

Time for your Tube. I moved the Star up to the left a bit, liked it better there. Copy and paste your tube, you may have to resize it. Do the Drop shadow as well.

Find a side lying doodle you like. I resized it to 70%, copy and paste. Place it below the star layer. Drop Shadow.

Find the upright doodle you like, copy and paste and resize it to 70%. Place it behind your tube and to the left. Drop Shadow.

Now grab the star frame layer and line it up to the star. Do Drop Shadow on it. You could color it if you like. Just use the magic wand to hi light it and then flood fill it with a pattern or color. I placed this layer right above the inside star layer.

Now I grabbed the beaded heart and resized it to 50%. Copy and Paste it and put it in the upper left hand corner. Now go to Rotate - Free Rotate - 35 to the left. Play with the positioning. Drop Shadow 1/-1 100 3 Sharpen.

Merge All

Now is the time to add your copyright info.

I used the Font FrancineHMK at 36

The Name:

I Duplicated the name. I stayed on the raster layer 1 and went to Effects - Alien Skin 5 Impact - Gradient Glow - Ghost Text. Apply. This will show up behind the other name layer.

Merge and you are done! I resized the tag to 400p x 400 p

Tutorial is written by Nasty Harpy. Purchased Kit from Toni

Oct 22 '08

All rights reserved by Nasty Harpy
This tutorial is purely of my own making and any similarities to another tutorials is purely coincidental.

All rights reserved by Nasty Harpy

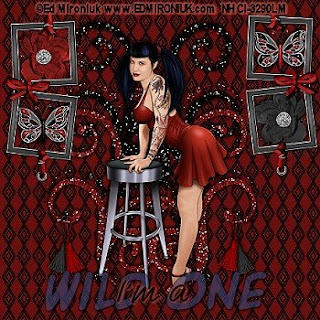
Wild One


I used PSP 9 to create this tutorial.

CILM Tou #32

Plugins needed:

Mosaic Antique

Scrapkit Metro Retro is by Toni and is a Freebee Kit. It can be found here

The tube is by Ed Mironiuk and can be purchased at CILM

Supplies:

Tube of choice

Metro Retro Scrap Kit

Font is ACME Explosive and 1 Archer

To get Started:

Choose your background paper. I reduced it by 55%. Now promote this layer to a raster layer. I then reduced the opacity to 62. Add a new raster layer and place it beneath the background layer. Flood fill it with black. Merge these two layers. I then did a sharpen.

Okay time to add your tube. Reduce it to fit if you need too. I did a DS on her of H/V 2 Op 70 Blur 5 do the -2 as well. Sharpen her.

Find the Doodles. I used both. I resized them by reducing to 55% and then doing it again. I applied the red one first, then duplicated the layer, and mirrored it. Move them to where you like them. I then merged them down and applied the same DS as above. Repeat this step with the black doodle. I took the black doodle layer and slid it beneath the red one.

Now find the tassels, I used both and I reduced them to 20%. I placed them. Now In your overview screen I increased the view to 300, and then loaded my eraser on the tools bar. I took the size down to 3 and left the rest alone. Back to the image and I used the eraser to remove the lines that didn't need to be there from the tassels, making it look like they fell behind the doodles. I then did the DS on them.

Now Merge Visible the all the layers.

Find the frames. I reduced them doing the 55%. I then duplicated and mirrored that layer. I placed them. Now hide the merged layers.

Use whatever flowers you like. I reduced them to 20%. I placed them, duplicated and did the Mosaic Antique on them. Then did the DS.

Find the Butterflies and place under the frames, and DS again.

Find the frames layer and DS them. I did H/V 1 OP 100 and Blur 2 and do the -1. Now merge visible the rest of the layers. You should have two layers of Merged layers.

Now is the time to add your text. I used A.C.M.E. Explosive and used a color from my tube. I then used 1 Archer all black and DS with another color from my tube.

Now add your copyright info.

Yer done!

Tutorial is written by Nasty Harpy. Scrapkit is provided by Toni

May 27 '08

All rights reserved by Nasty Harpy
This tutorial is purely of my own making and any similarities to another tutorials is purely coincidental.

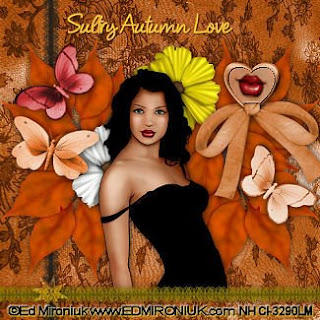
Sultry Autumn Love


I used PSP 9 to create this tutorial.

CILM Tou #32

There are no plugins needed

Scrapkit Autumn Splendor is by Lippy and can be found here

The tube is by Ed Mironiuk and can be purchased at CILM

Supplies:

Tube of choice

The Autumn Splendor Scrapkit

There is a freebie version of this scrapkit at the site

Font is 2Pease Fancy Free

To Begin:

1. Open a 500 x 500 transparent image. Select All

2. Find paper3 in the scrapkit items. Copy and Paste into selection. Selection None.

3. Find your tube and resize it. I did 70% on mine. Copy/Paste. Drop Shadow V & H 1 Op 70 Blur 15. Position the tube in the center. (I will probably be there already)

4. Find the ribbonheart4 item and resize to 30%. Place in the upper right corner. Drop Shadow as above.

5. Close of the Tube and background layer.

6. Return to your original tube and crop out the face or other body area of the tube that you like. Copy. With your magic wand hi light the inside of the heart and expand 1. Paste into the selection. DO NOT DESELECT.

7. Drop Shadow V & H 1 Op 100 Blur 1 then repeat with V & H at -1. Adjust - Sharpen. Deselect. Reopen the other layers.

8. Find butterfly3. Colorize to match your tube. Resize to 4%. Copy/Paste and rotate left at 45. Place. Drop Shadow V & H Op 70 Blur 15.

9. Find butterfly4. Repeat the above but rotate the item to the right.

10. Find butterfly7 and again repeat but time rotate 15 to the left.

11. Find orangeleaves in the scrap items and resize to 10%. Sharpen. Copy/Paste then position behindthe left butterfiles. Rotate left 15. Duplicate and flip.

12. Merge the two leaves layers together. Drop Shadow at the settings already there. Duplicate and Mirror.

13. Find flower1 and resize to 10%. Place it behind her head to the right and drop shadow.

14. Find flower1_2 do as step 13 but place to the left of her and lower.


These next steps are optional:

15. Find 2tonebrownlace. Colorize it to match the yellow flower but make it darker. I did Colorize 38 and 255. Resize to 15%. Copy/Paste move to the top of the layers. Position at the bottom area of the tag. Drop Shadow with setting already there.

16. Go back to the colorized version of the lace and undo it. Now go to Brightness and Contrast. Use these settings. -83 and -74. Rotate the lace 90. Copy/Paste and move it to position but send to the bottom of the layers just above the background layer. NO DROP SHADOW.

17. Find the swirl item. Resize it to 2%. Brightness and Contrast again. Settings 78 and 19. Drop Shadow and then in your blend mode (found beside where you play with the opacity of a layer) choose soft light.

To finish:

18. Merge all layers, Add your words. I used 2Peas Fancy Free 28pt #e77f3c color in the foreground and #f8e91d in the background. Drop Shadow V & H 1 Op 70 Blur 2 Merge again.

19. Resize to 325 on the largest side, sharpen. Add Copyright info.

Yer done!

Tutorial is written by Nasty Harpy. Scrapkit is provided by Lippy

March 25 '08

All rights reserved by Nasty Harpy