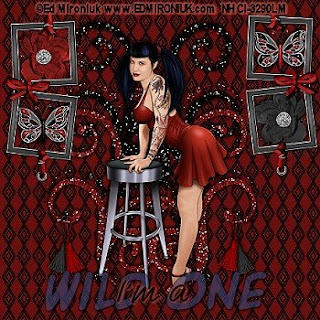
I used PSP 9 to create this tutorial.
Plugins needed:
Mosaic Antique
Scrapkit Metro Retro is by Toni and is a Freebee Kit. It can be found here
The tube is by Ed Mironiuk and can be purchased at CILM
Supplies:
Tube of choice
Font is ACME Explosive and 1 Archer
To get Started:
Choose your background paper. I reduced it by 55%. Now promote this layer to a raster layer. I then reduced the opacity to 62. Add a new raster layer and place it beneath the background layer. Flood fill it with black. Merge these two layers. I then did a sharpen.
Okay time to add your tube. Reduce it to fit if you need too. I did a DS on her of H/V 2 Op 70 Blur 5 do the -2 as well. Sharpen her.
Find the Doodles. I used both. I resized them by reducing to 55% and then doing it again. I applied the red one first, then duplicated the layer, and mirrored it. Move them to where you like them. I then merged them down and applied the same DS as above. Repeat this step with the black doodle. I took the black doodle layer and slid it beneath the red one.
Now find the tassels, I used both and I reduced them to 20%. I placed them. Now In your overview screen I increased the view to 300, and then loaded my eraser on the tools bar. I took the size down to 3 and left the rest alone. Back to the image and I used the eraser to remove the lines that didn't need to be there from the tassels, making it look like they fell behind the doodles. I then did the DS on them.
Now Merge Visible the all the layers.
Find the frames. I reduced them doing the 55%. I then duplicated and mirrored that layer. I placed them. Now hide the merged layers.
Use whatever flowers you like. I reduced them to 20%. I placed them, duplicated and did the Mosaic Antique on them. Then did the DS.
Find the Butterflies and place under the frames, and DS again.
Find the frames layer and DS them. I did H/V 1 OP 100 and Blur 2 and do the -1. Now merge visible the rest of the layers. You should have two layers of Merged layers.
Now is the time to add your text. I used A.C.M.E. Explosive and used a color from my tube. I then used 1 Archer all black and DS with another color from my tube.
Now add your copyright info.
Yer done!
Tutorial is written by Nasty Harpy. Scrapkit is provided by Toni
May 27 '08
All rights reserved by Nasty Harpy
Hi- the scrapkit link is down, no longer working on 4shared...sorry!
ReplyDelete